Add these to authorized key files and into resource preferences.
Compute Resources
Navigate to Admin Dashboard ⇒ Compute Resources ⇒ Register
Add Host Name, Description and create the resource.
Then keep adding information on rest of the appeared tabs.
Queues (Queue name is uniqie and cannot be updated. Can delete and create new if required)
File Systems (This is only for information capturing for future use. Currently this information is not used)
Job Submission Interfaces
Data Movement Interfaces
Similarly you can add multiple compute resources in to your gateway by selecting 'Register' from the left-hand-side menu.
To view the added compute resources navigate to Admin Dashboard ⇒ Compute Resource ⇒ Browse
All the resources will be listed. Gateway admin can view, edit, delete and enable and disable them.
Storage Resources
Navigate to Admin Dashboard ⇒ Storage Resources ⇒ Register
Add Storage Name, Description and create the resource.
Then add data storage information in
Data Movement Interfaces
Similarly you can add multiple storage resources in to your gateway by selecting 'Register' from the left-hand-side menu.
To view the added resources navigate to Admin Dashboard ⇒ Storage Resources ⇒ Browse
All the resources will be listed. Gateway admin can view, edit, delete them.
GatewayPreferences for Resources
Navigate Admin Dashboard ⇒ Gateway Profile
Both compute resource and storage resource specific preferences are defined here.
To add compute resource related preferences click "Add a Compute Resource Preference" and select the resource from the drop-down list.
Add/select preferred options and click "Set preferences".
Repeat this for all the resources used within the gateway.
For each compute resource, gateway admin need to specify;
Preferences can be overridden by Airavata - Yes/No?
Resource login name
Preferred job submission and data movement protocols
Preferred queue
Scratch location
Project allocation number
Resource specific credential store token (When added Base Credential Store Token is not valid for the specific resource)
For adding storage resource preference click "Add a Storage Resource Preferences", and rest is similar to adding a compute resource preference.
For a gateway currently when a storage resource is selected, that resource ID need to be added in to the pga_config.php file in config folder of the hosted gateway.
For storage resource preference, gateway admin need to add;
Login username
File System Root Location
Resource Specific Credential Store Token
Apart from adding preference the same interface is used to assign a 'Base Credential Store Token". If this is added this is the token used across the gateway for communication with all the compute resources and storage resource.
Application Catalog
Gateway admin add applications in to the gateway. Adding an application is a 3 step process.
Admin need to add application module, interface and deployment information in order to launch specific application jobs on compute resources.
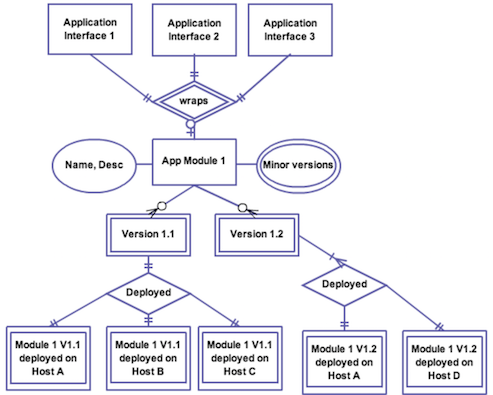
Relationship between application module, interface and deployments.
Application deployment describes application deployment details on a specific resource.
For an application for each resource there is a separate deployment.
A single application can be deployed in multiple resources.
Multiple application modules can be deployed in a single resource. E.g: Gaussian09 and Gaussian16 both exists in bridges.psc.edu and they both use same application interface.
Credential Store
Navigation: Admin Dashboard ⇒ Credential Store
This interface is used to generate SSH key + token pairs.
These generated keys can be added in to the authorized key files in each resource for SSH key based communication.
Generated key can be either assigned at gateway level; one key + token pair for all the resources OR have separate key for each resource.
SSH keys are used for communication with compute resources, storage resources and WSO2 identity server.
WSO2 IS Configuration
Setting up WSO2 IS for the new gateway.
Once PGA is cloned all information related to user identity will be in app/config/pga_config.php. No modifications required for users who are using hosted IS.
For user identity management we could either use Airavata WSO2 IS or users own WSO2 IS.
Download WSO2 Identity Server 5.0 from http://product-dist.wso2.com/products/identity-server/5.0.0/wso2is-5.0.0.zip
Extract the downloaded IS binary archive to a location .
Set JAVA_HOME variable and add jdk bin directory to the PATH variable.
Open /repository/conf/carbon.xml and change the following property to false
<HideAdminServiceWSDLs>false</HideAdminServiceWSDLs>
Execute the following command to run the server
sh /bin/wso2server.sh
You should be able to login to the Identity Server Web App using your browser with url http://localhost:9443/carbon . Default admin credentials are username: admin, password: admin
For more information regarding WSO2 Identity Server refer WSO2 IS Server Gateway admin will be provided with;